Light & Land
5 tips for using Photoshop to take your images to the next level
17th January 2018
5 tips for using Photoshop to take your images to the next level
I’m a huge Lightroom fan! I grew up with Photoshop but when Lightroom arrived I quickly jumped on board and learned how to do almost everything I needed inside Lightroom. However, when it comes to tricky local adjustments, fixes & manipulations, text or composting, there really is no substitute for Photoshop.
Unlike Lightroom, Photoshop’s editing system is very open. It allows you to apply any of its adjustment and manipulation tools to areas of your image that you choose. Photoshop also supports multiple image layers that can allow more creativity and flexibility when manipulating images. If you want to add lots of text, Photoshop provides a very comprehensive set of tools. By using these simple, but powerful elements, users have developed limitless ways to enhance and manipulate images.
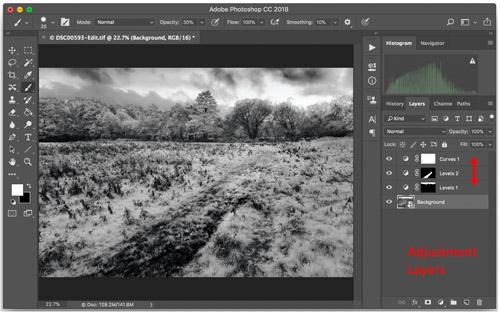
1.How to make adjustments to your image that you can re-adjust later
One of the most common ways to edit images in Photoshop is to select an area you want to work on, create a ‘mask’ from this selection (a mask limits where an adjustment will operate) and then put the mask and adjustment onto its own layer. Using this process (which is very quick to learn) you can build up an almost unlimited number of non-destructive, localised edits of your image.
The most common way to create a mask is to first select a part of your image. Photoshop has an array of selection tools, including many drawing tools, colour range, brightness range, focus range and many, many others. Once you have made a selection, you choose the type of image adjustment you want and create a new adjustment layer. You can now re-adjust your local edit at any time.
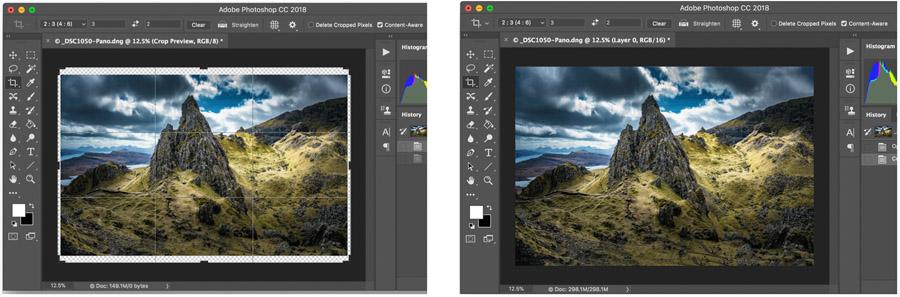
2.Automatically create more image so you can crop and rotate without loss
Photoshop uses content aware technology (now branded Sensei) to create new image information using what is already inside your image. This is really useful in photography if you need to rotate your image to correct a wonky horizon, but you don’t want to crop the edges. You can also re-compose your image by adding more background to allow a different crop. Here I have cropped to 3:2 ratio and added more sky and ground.
3.Manipulating images
Photoshop can alter your image, not just adjust it, actually manipulate the very pixels themselves. Many of the tools that do this are found in the filter menu. One of the filters I love is Blur. This can be used to create many different effects, including defocus and motion.
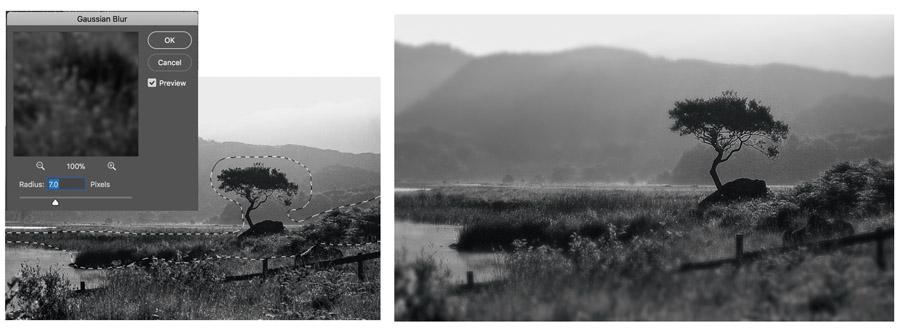
In this example I have selected an area using the lasso tool, inverted the selection and applied a Gaussian blur from the filter menu to the background, creating the effect of a wide aperture telephoto lens.
4.Creating images with impossible depth of Focus
Photoshop allows multiple images to be combined in special ways, such as HDR, Panoramas and Focus Stacks.
The point of true sharp focus in an image is the focal point, either side of this your image becomes progressively soft. If you want an image to be very sharp from close to the camera to far distant in a single shot you must either change the plane of focus using camera movements or stop right down and suffer diffraction softening of your whole image.
Focus Stacking allows you to combine multiple images, where the focus is set at different points through the scene. This creates the impression of incredible deep depth of focus.
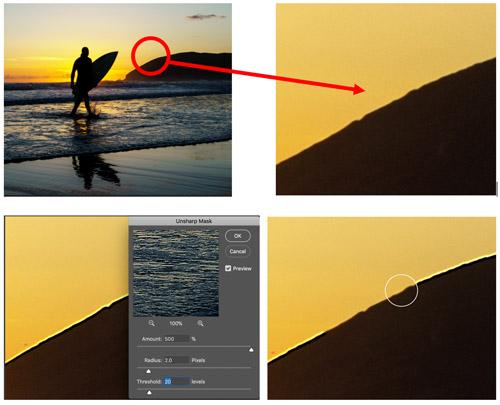
5.Get more sharpening without the side-effects
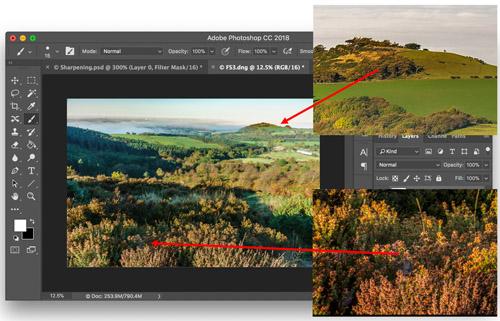
If you like to sharpen your landscapes to bring out detail and texture, you can often have problems on high contrast edges, such as horizons. If the sharpening amount is increased too much, halos of white appear along these edges. By the time we have reduced radius or amount to reduce halo’s, the overall sharpening is reduced or completely removed.
However, Photoshop allows us to use a mask with our sharpening filter. We can prevent the sharpening software from working on these high contrast edges. Simply paint on the mask with black along the edges we want to protect. If there are lots of edges, I like to create an automatic mask by asking Photoshop to find the edges for me. I then automate the whole process with actions.
In this example, I have used the power of masking to locally remove the halo on the hillside.
If you use Lightroom and would like to learn more about using Photoshop with your Lightroom system, Join Adrian on one of our Lightroom Next Steps workshops.


